Through the new website feature at Fiber Optic Center, AskFOC, where customers can ask technical questions as another option of support, there are several questions that come in on a consistent basis. One such question centers around noticing a large epoxy ring with visual inspection. AskFOC is found at https://focenter.com/askfoc/.
Occasionally we receive visual inspection pictures from multimode connectors that shows an evident rough epoxy ring around the fiber like this picture.
Looking at the picture, there are a couple of things that are very different than normal microscope front view (listed below).
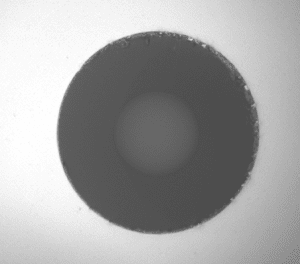
- The ferrule has a very large epoxy ring, meaning that the inner diameter of the ferrule is likely larger than a standard multimode 127um. It’s worthwhile performing an incoming inspection with a ferrule gauge kit to determine ID of the ferrule. As ferrules are sorted by precision, the worst ferrules in terms of ID and concentricity are the multimode ferrules. Having a significant epoxy area will generally enlarge the chance of epoxy coming out during fine polishing, resulting in scratches and unattractive visual appearance.
- As most connectors use a heat-cure two component epoxy it’s very important to ensure the proper mix ratio and following the curing time. Some applications require a 3 step curing process (pre-heat, curing, cooling down) to ensure that the epoxy is properly distributed in the ferrule without creating stress on the fiber when performing a temperature cycling test.
- Cleaning the fiber with high purity of Isopropyl Alcohol is necessary to create a good bounding with the fiber. Lower grade alcohols contain H2O which could leave miniscule small drops on the fiber which might be captured when inserting the fiber into the epoxy/ferrule. When heating the ferrule the water needs to outgas, creating air-bubbles in the epoxy.
- Another phenome we notice at this picture is the epoxy residue at the fiber, which isn’t normal either. It would be good to check the ferrule geometry and pressure settings with the polisher. Exceptional high pressure settings will create higher friction and/or vibration during polishing.
- When bringing the epoxy into the syringe, we recommend an additional procedure to remove the air-bubbles out of the epoxy. If the epoxy contains air-bubbles it likely will remain during the curing process. This is evident in the above picture. A centrifuge or vacuum pump would be sufficient.
Another influence might be that the ferrules are insufficient filled with epoxy into the ferrule might relate to air bubbles as well. Please see another blog that describe more in details about this https://focenter.com/assuring-the-correct-amount-of-epoxy-is-in-the-connector/