
Since attending the RAPID 3D event this summer, I’ve been fielding questions related to sanding 3D printed objects. Thanks to our expertise in abrasive films, several engineers and technicians at 3D printer manufacturers and 3D printing production houses – as well as 3D printing hobbyists – have been pinging me with questions related to sanding 3D printed objects.
Here are some of the questions we get about sanding 3D printed items:
- “I create tabletop prototypes of rockets for a government contractor. To look professional, they must have a high polish. I’m talking luster! Can you give me how-to advice to polish 3D printed objects?”
- “My automotive parts company is on the ‘bleeding-edge’ of 3D printing applications. We use an FDM 3D printer to develop our prototypes and finished parts. In order for finished parts to perform properly, we need to get a smooth finish. Do you have sandpapers or abrasive films that provide a smooth finish?”
- “As a hobbyist, I am discovering many exciting applications for 3D printing. My struggle is with the limitations of sanding. It’s course, messy and ineffective. I’m looking for advice to use sandpaper or abrasive films for my 3D printing projects to get a polished finish. Is this even possible?”
- “I work for a 3D printing production house. Many of our customers need a smooth finish. They are expressing frustration with sandpaper. Can your 3D printer polishing film achieve the degree of smoothness they’re looking for?”
Some of these folks are using 3D printing to create prototypes, which require an aesthetic finish to impress a major customer. Other 3D printed objects are used in manufacturing and require smoothness for functionality. Either way, 3D printing professionals and hobbyists are frustrated that sandpaper does not offer the smooth polish – the luster – they desire.
Clearly, there’s a need for 3D printing polishing film. This fine-grit, abrasive material provides a smooth, mirror-polish finish – well above and beyond sandpaper.
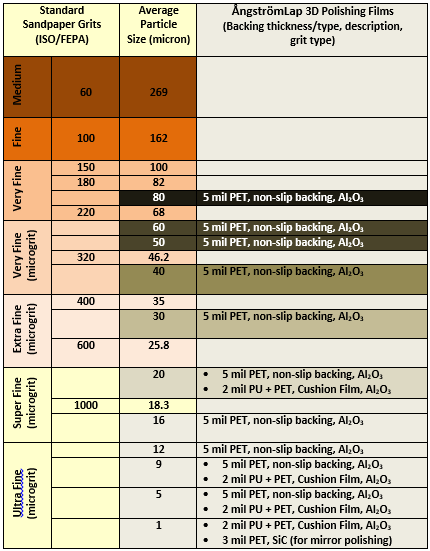
As experts in fiber optics and fine-grit abrasive films, we exclusively offer 3D Polishing Films that deliver a mirror-polish finish for the 3D printing industry. Our ultrafine 3D printing polishing films have grit sizes 10 times smaller than the finest super-fine micro grits available at the average hardware store – as small as 1 micron! (See chart, below.) This makes it possible – and surprisingly easy – to achieve a smooth, glossy polish on your 3D printed object.
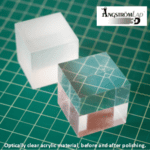
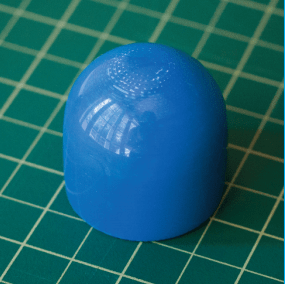
As seen in these photos, below, this is a FDM (Fused Deposition Modeling) 3D printed object before and after polishing. Note the inferior infill near the top of the dome becomes more apparent after polishing.

Tips to polish 3D printed objects
Polishing your 3D printing project is relatively fast. For example, using our ÅngströmLap 3D Polishing Films, a print roughly the size of a TV remote can be polished in about 15 minutes. Here are a few tips for best results:
- Start with a good print job – Use the 3D printer’s smallest layer height (highest resolution). On most printers, this is 0.1mm or less. This is especially important for the outermost layer. Sanding and polishing will remove some material from the surface, which can reveal voids caused by incomplete fill of the underlying layers. Plan to use 100% infill to fill these surface voids. For finer features, use slower printing speeds.
- Gradually decrease grit size when sanding and polishing – Whether the composite polymer is a type of thermoplastic, metal, or rubber, the sanding and polishing process is similar to sanding wood. The rule of thumb is to gradually decrease grit sizes until you obtain the desired smoothness. As noted above, our ÅngströmLap ultrafine 3D printing polishing films have grit sizes 10 times smaller than the finest super-fine micro grits available at a hardware store – as small as 1 micron. (I encourage you to review the chart, below, and refer to it often as a resource.)
- Wet-sanding offers more luster – To achieve a smooth, glossy finish for 3D printed objects, wet-sanding offers a significant advantage. As an example, think about automotive paints and their mirror-smooth look. Wet-sanding is the key to achieving that luster. Wet-sanding removes large scratches left by the dry-sanding process. Plus, the water acts as a lubricant and carrier for sanding dust. Our ÅngströmLap 3D Polishing Films are designed specifically for polishing 3D printed objects and can be used wet or dry. They have a durable, waterproof, plastic backing, which makes them especially amenable to wet sanding. You can also rinse or soak them in water if they get clogged. (This offers a more robust, longer-lasting solution than sandpaper.) In addition, several of our ÅngströmLap 3D finer grits are unique “cushion films” – they have a specially designed cushion layer that provides a very slight give to the film. This allows the film to better conform to the surface. The cushion films provide increased surface area and smoothing action for the grit. The grits are tightly graded aluminum oxide and silicon carbide spheres, with high hardness and durability. One of our finest films, 1-micron SiC, is specialized for mirror polishing. (Refer to the chart, below.)
Steps for sanding your 3D printing project: How to use ÅngströmLap 3D Polishing Films
- Start with the largest grit to remove all pits, bumps, and scratches. Most polymers are easy to sand, so don’t overdo it. However, it is important to sand until you can’t see any odd divots or bumps. Sand evenly across the surface in small circular movements. The first grit will take the longest, will look the worst, and is the most important step. Use a good light and inspect the surface carefully. If you miss any scratches that are deeper than the ones you are making with the grit you are working with, they will become prominent as you advance, and you may need to start over. Rinsing the 3D printed object may help you to see missed pits, bumps, and scratches.
- Initial sanding and polishing are usually done dry. At any point, you can switch to wet-sanding/wet-polishing by rinsing or soaking the 3D polishing film in water. If your goal is to achieve a glossy finish, you will definitely want to include wet polishing steps as finishing stages in your polishing process.
- When you have verified the surface is even, move to a finer grit abrasive film until you obtain the desired surface finish. Our ÅngströmLap 3D Polishing Films come in several grit sizes: Very Fine, Extra Fine, Super Fine, and Ultra Fine. These abrasive films enable you to achieve a mirror-polish finish that would be difficult (if not impossible) to get with sandpaper.
If you need a high-gloss luster when sanding your 3D printed object, I encourage you to experiment with our ÅngströmLap 3D Polishing Films. These fine-grit films may the solution you’ve been looking for to achieve a smooth, mirror-finish polish for your 3D printing projects.
* Fused Deposition Modeling and FDM are trademarks of Stratasys Inc.