Marcel Buijs, EMEA Business Development, Technical Sales, Fiber Optic Center, Inc. with over twenty-five years in the photonics industry, brings the latest information on making the ultimate fiber optic product and improving process yield.
Without question, good stripping techniques in your fiber optic cable assembly process are imperative. What happens if you damage the fiber during this production step? A tiny scratch or nick in the optical fiber is like a time bomb. Eventually, this imperfection can initiate a crack when the connector is exposed to stress or thermal cycling. (Think about how a diamond blade scratches glass – this weakens the structure and initiates a break.) If the fiber cracks in a cable assembly, the connection is weakened or lost. Your cable assembly house could face repairing or replacing connectors in the field, which could be exceedingly costly for your company.
This article offers multiple tips and best-practice techniques to implement

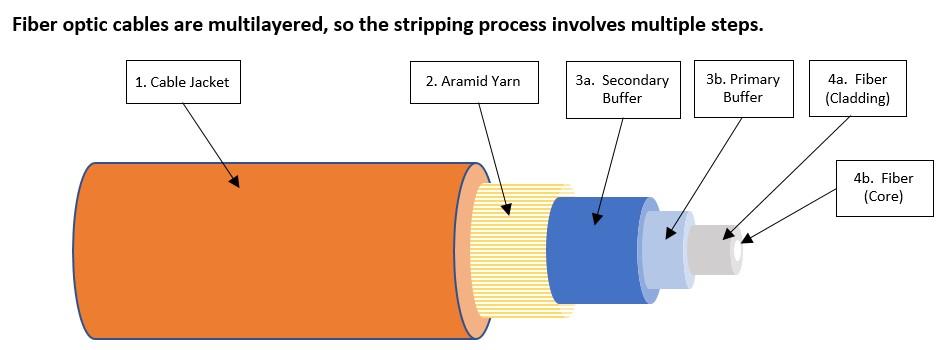
Above is a diagram showing the various layers of a typical indoor patch cable. Other types of cables may have different construction or additional layers, but regardless of the number and types of layers involved, the following generally holds true. Let’s explain a little about common layers, and what’s important to consider when stripping.
Firstly, it is important to consider that when stripping multi-layer cables for connectorization, each layer must usually be stripped individually, as they all usually need to be stripped to different lengths. That is, you cannot strip the above cable in one “go”, the layers must be stripped progressively. The Jacket must be stripped, then the Aramid Yarn, then the Buffers. (there is a slight exception with the Buffers, we’ll elaborate below). And thus, when stripping an outer layer, care must be taken to ensure that the layers underneath are not damaged. Regardless of the stripping tools you use, always be sure to properly maintain the, to keep cutting edges sharp.
Outer jacket (1). This flexible insulating material is also called a sheath, typically a soft plastic material.
- On single-fiber cables (as diagramed above), this jacket OD is usually 2-3mm in diameter and can be stripped using common wire strippers of the appropriate gauge.
- When selecting the proper wire-stripper gauge, it is important to consider the layer underneath (in this case, the Aramid Yarn): you do not want to damage any of the yarn fibers, as they play an important role in connector tensile strength.
- After removing the Jacket, observe the Aramid Yarn fibers at the strip point. Are they damaged? Are any of them cut? Even a small % of cut fibers will significantly reduce finished-product pull strength. If you see cut yarn fibers, likely you need to use a larger gauge wire stripper.
- The edge of the jacket, after stripping, should be cut clean—not torn or ripped.
Aramid yarns (2). These strength members are also known by the trade name Kevlar®.
- They provide tensile strength to the finished cable assembly (they are crimped to the connector body, so that any pull stress applied to the cable after it is connectorized will be taken by the aramid yarn, and not the fiber itself).
- These high-strength synthetic fibers are notorious for dulling cutting blades. While this fabric can be cut with any sharp knife, razor blade, or scissors, they will easily dull such common off-the-shelf tools. Scissors designed specifically for cutting Kevlar should be used and will provide a much longer service life. They will need to be replaced or re-sharpened when they no longer cut easily.
The Secondary Buffer (3a). Is typically a soft plastic material, and can vary in diameter, but is most commonly 0.9um (900um) in diameter.
- Proper stripping can be done with strip tools designed specifically for the diameter buffer you are trying to strip. These are generically referred to as “Fiber Strippers”.
- There are a variety of tools available to strip these Buffers, from simple hand tools to heated hand tools (softening the Buffer tube, making it easier to strip), to fully automated tools. All can be used successfully, but the automated tools require less operator skill and are much more consistent/repeatable.
- Regardless of the type of tool used, they all are specifically made for this purpose, and are designed with blade dimensions that help ensure the glass fiber underneath is never touched by the blade (creating potential damage to the glass fiber).
- The cut edge should be straight and clean-cut, not cut at an angle, or jagged or torn (indicating worn-out blades on the stripping tool).
Primary Buffer (3b). Typically a 250um acrylic coating is applied directly over the glass optical fiber.
- This coating is typically bonded to some degree to the Secondary Buffer and thus is removed at the same time as when stripping the Secondary Buffer. If any Primary Buffer remains on the fiber after stripping the Secondary Buffer, the same tool can be used to remove it.
The glass optical fiber itself (4a and 4b).
- Note that while the Cladding and Buffer are 2 distinct separate regions within the same fiber, they are NOT able to be separated. You cannot strip the Cladding from the Core—-they are both inseparable components of the Fiber.
Tips and techniques when using stripping tools
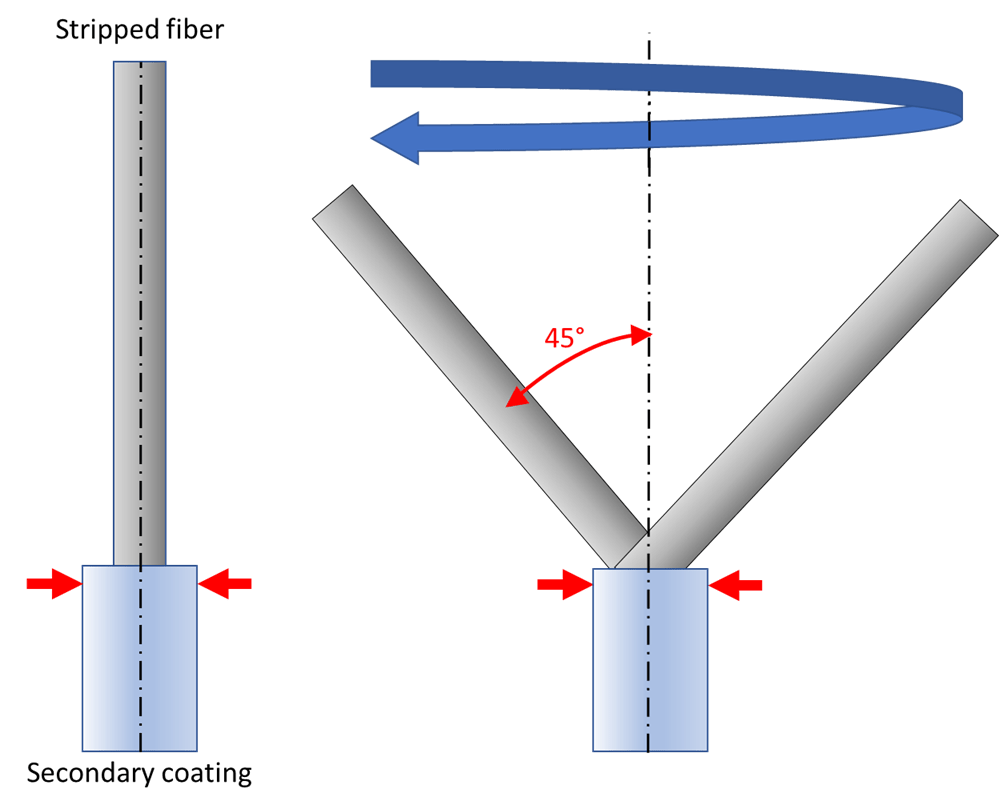
“First, Do No Harm”: I want to re-emphasize the importance of not damaging inner materials when stripping any layer of the cable. This is most important when removing the Buffer materials directly protecting the optical fiber. If the blade of the strip tool contacts the bare fiber, it is very easy to create a damaging “nick” or scratch in the fiber OD, which significantly reduces product reliability—–a fiber that has been scratched on the outer diameter may indeed function perfectly well for some time. Such damage, however, is a ticking time-bomb: they are stress points from which cracks in the glass can propagate over time, leading to (potentially) sudden and catastrophic failure of the cable assembly. This is why most Cable Assembly Houses will implement some method of evaluating newly-stripped fibers to help ensure no unseen damage has been done during the stripping process. A common method is to perform a 45-degree bend test on the fiber where, if the fiber OD had been “nicked” by the stripping tool, this bend would cause the fiber to break at the scratch point. While this would then require re-striping of the cable, it’s a much better problem to resolve than a fiber break in a deployed product!

Bend test explanation: hold the fiber close to the stripped area (red arrows) bend the stripped fiber about 45 degrees and perform the bending in every direction (360 degrees). Due to the induced stress, any damage will lead to a crack of the fiber at the strip transition
Maintenance: It’s essential to replace dull tools and maintain machines; they must have sharp cutting edges. This is the “golden rule” in stripping. Whether you use hand tools or automated stripping machines, in time, the cutting edge will wear. A dull cutting edge can bend and stress the fiber. Do not continue using a dull tool or blade and put off buying a replacement, thinking you are saving money. In the end, this could cost a significant amount of time and money, because the connector could fail and need to be repaired or replaced in the field. A helpful hint: the hand tools used for such stripping are not expensive, and it is best to destroy and throw away worn tools and blades (as opposed to saving them as “backups”), to ensure they are not accidentally used in production.
Note the cable diameter and jacket thickness for each cable – Stripping cables and fibers is a delicate process. Carefully set your hand tool or machine tool to the right cable diameter and jacket thickness to prevent damaging the inner materials: aramid yarns, inner tubing, and glass fiber.
Use the proper strip template when stripping for connectorization – All connector types are not designed exactly the same and will have specific strip-length requirements for Aramid Yarn and Buffers. The most connector will have a “stripping template” available to describe the optimum strip lengths for each part of the cable. Be sure to ask your connector supplier for the proper strip charts prior to building.
Please contact us for additional information. Phone numbers are: 800-473-4237 or 508-992-6464 and email is: sales@focenter.com.
Additional resources from the FOC team include:
- View Hand Tools Technical Solution Content
- View the Glossary, Acronyms, Military Specifications for Connectors
- Q&A Resource: email technical questions to AskFOC@focenter.com


