Fiber Optic Center will be at Anga Com - Schedule your meeting with a member of the FOC team now
polishing instructions
Domaille 4 and 5 Series Polishing Instructions
Fiber Optic Center is the industry leader in cost effective, high-performance polishing processes for volume assembly production. Achieving consistent results that meet the demanding technical specifications for high-speed high data rate systems requires the optimization of many factors throughout the termination and testing process.
These factors include:
- suitable fiber
- lapping film grit sizes & materials
- suitable epoxy
- polishing solutions
- proper mixing, application & curing of epoxy
- calibration & quality of test instruments
- connector quality & tolerances
- adapter quality & tolerances
- machine & fixture quality
- test methods & conditions
- pressure & time of polishing at each step
- overall cleanliness
- lapping film quality & consistency
- specific cleaning procedures
This will not affect the performance of the film. For silicon dioxide final films, only use a water soaked wipe. Alcohol will break the binder down on this type of film.
General Instructions
1. Prior to running a loaded polishing fixture on the machine, perform a quick de-nubbing or air polish to remove the sharp edges from the fiber to get the fiber flush with the epoxy bead. Ten to fifteen small circles with 9-16um silicon carbide should be sufficient but will vary according to cleave length. The use of the Sagitta Comet laser cleaver eliminates this step, helps give a consistent starting point, and decreases the polishing process.
2. Clean pads and plates with at least 99% pure isopropyl alcohol, lint-free wipes, distilled water, and clean, dry air. ITW Chemtronics 6704 Econowipes, CleanTex 604 lint-free wipes, or Kimwipes are recommended to insure that no contamination occurs during the cleaning process.
3. Use a minimal amount of distilled water to adhere non-PSA lapping films to the polishing surface (rubber pad or glass plate). Keep air bubbles to a minimum, and ensure that no debris is trapped between the film and polishing surface. The use of an acrylic roller will help insure there are few if any air bubbles.
4.When using de-ionized or distilled water as a polishing fluid, make sure a fine mist or spray is applied uniformly across the film and flocked pads. Do not let the water pool. FOC recommends using the AS8 or AS16 ÅngströmSpray spray bottle to apply a fine mist.
5. Between each polishing step, flush out connector end-faces, work-holder surfaces, and surface and underside of polishing pad with de-ionized water, and then clean with lint-free wipe and blast with clean, dry, high-pressure air. Also, clean the lapping film by flushing out with distilled water, and then (except for silicon dioxide final films) use an alcohol (99% isopropyl) soaked wipe, and wipe film from center to the outer edge.1 Proper cleaning will help insure an end-face free of scratches, pits and defects, and extend the life of the film.
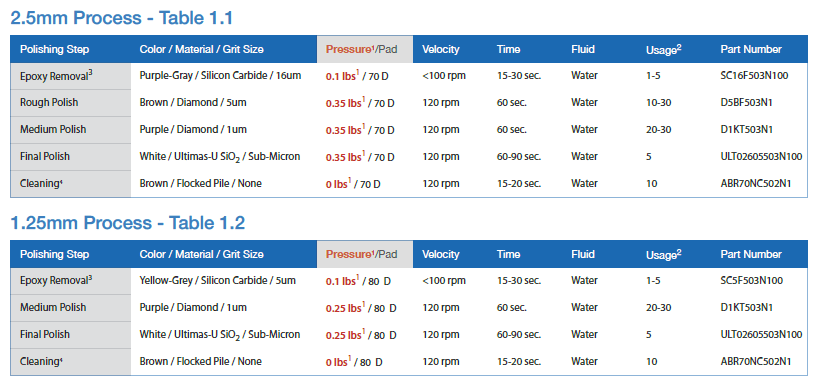
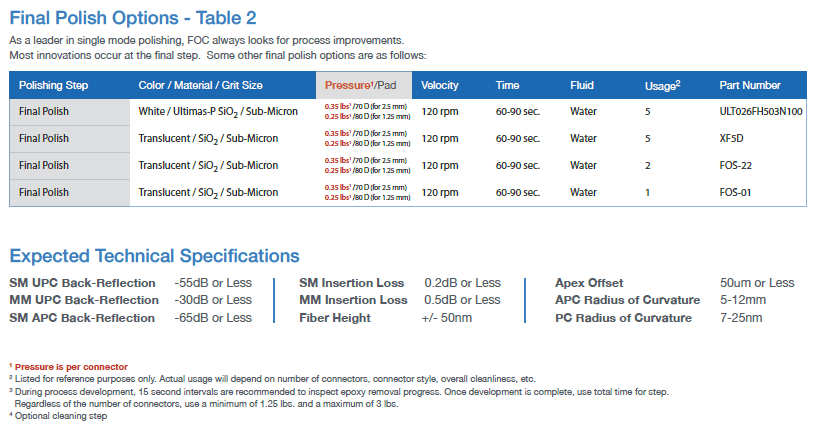
6. Refer to the tables for recommended processes. Please note that these are generally starting points and adjustments will need to be made based on numerous factors like connector style and manufacturer, number of connectors per fixture and required performance. Fiber Optic Center has the technical staff on hand to assist you in defining your own custom process to achieve your desired results.
1 Dye may slightly come off onto an alcohol soaked wipe. This will not affect the performance of the film. For silicon dioxide final films, only use a water soaked wipe. Alcohol will break the binder down on this type of film.
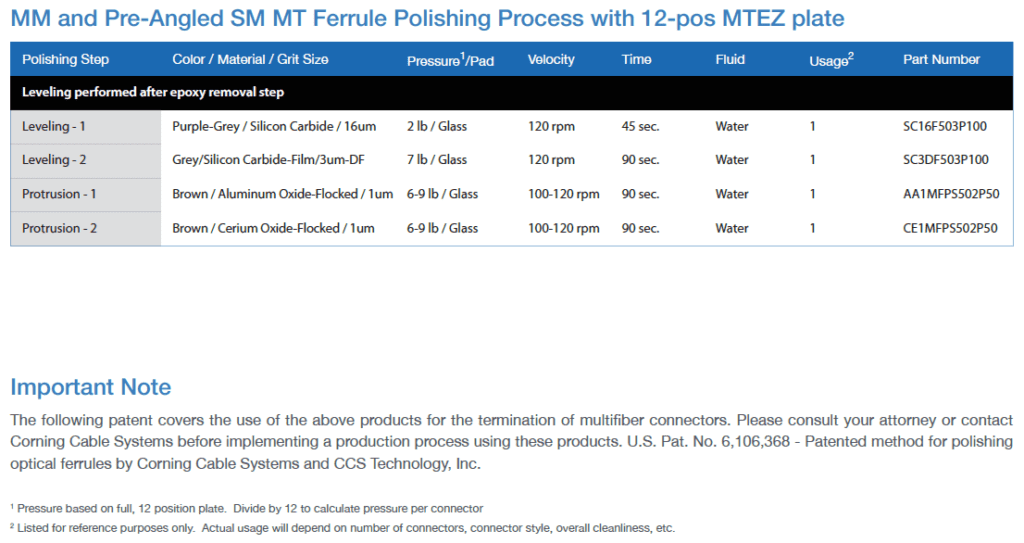
MT Polishing
As with all polishing, it is important to control every aspect of the process. This becomes even more critical when polishing multi-fiber MT ferrules. Process will vary depending on the ferrule manufacturer and type. FOC recommends using the best ferrules to insure consistent results. Proper polishing and cleaning technique also become increasingly vital. The use of the Sagitta Comet-MT laser cleaver helps give a consistent starting point, decreases the process time and gives better results. These processes and techniques work with most commercially available ferrules, but fine-tuning may need to be done. Please don’t hesitate to contact us for assistance in making these process adjustments, so results meet your requirements.
MT Epoxy Removal - Flat And Angled
FOC recommends the majority of epoxy be removed by hand using 30um or 16um silicon carbide flat PSA film (SC30F503P/SC16F503P) on a glass plate:
1. Load all ferrules into flat polishing fixture with epoxy window facing away from center of plate using the supplied torch wrench.
2. Attach fixture to machine arm.
3. Lift arm to vertical position.
4. At first very GENTLY move polishing plate across all ferrules to de-nub the fibers. Fiber breaks can occur here if not done carefully.
5. Once fibers are at least flush with epoxy bead, gradually increase the pressure until the majority of epoxy is removed from all ferrules.
- More important than the amount of epoxy left is that the epoxy beads are uniform in size.
6. Move on to the first leveling step on the appropriate table.
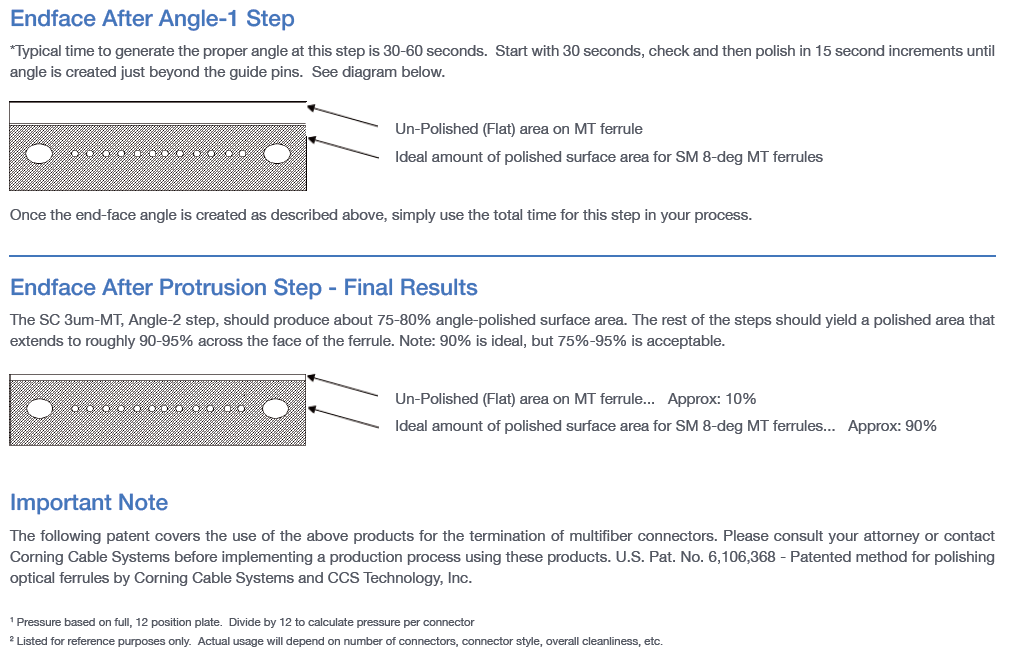
IMPORTANT NOTE
The following patent covers the use of the above products for the termination of multifiber connectors. Please consult your attorney or contact Corning Cable Systems before implementing a production process using these products. U.S. Pat. No. 6,106,368 - Patented method for polishing optical ferrules by Corning Cable Systems and CCS Technology, Inc.
Cleaning Instructions
Cleaning between polishing steps is extremely important to achieve optimum results. Distilled water, clean dry air, and lint free wipes should be used.
1. After each polishing cycle, spray the entire surface of the bottom of the polishing fixture, allowing all the polished material to flow into the drip tray. Then, spray water directly onto each connector end face. This will keep the guide-pin holes clean and reduce cross-contamination.
2. Once the plate and ferrules have been thoroughly sprayed with water, use clean, moisture-free, high-pressure air to blast the water off the plate, concentrating the air directly into the guide-pin holes.
3. With a water or alcohol-soaked (99% isopropyl) Kimwipe, wipe the bottom of the connector fixture, along with the outside perimeter, and blow dry with clean, moisture-free, high-pressure air. This cleaning procedure needs to be repeated after each polishing step. It is recommended that the cleaning process is performed before you remove the used film. This will minimize the possibility of cross contamination from step to step.

Fiber Optic Center is your resource to help answer technical questions. Email your questions to our AskFOC tool at AskFOC@focenter.com. Our Technical Team will answer your questions.
Follow Fiber Optic Center @FiberOpticCntr